
Grilled Cheese Patty Melts are, for many, the pinnacle of comfort food – a beloved diner classic that masterfully bridges the gap between a humble grilled cheese and a hearty burger. I’ve always found immense joy in the harmonious blend of flavors and textures that define this iconic sandwich. Imagine perfectly caramelized onions, slow-cooked until they’re rich and sweet, nestled alongside a juicy, savory beef patty, all embraced by luscious, gooey cheese. Then, picture this masterpiece grilled to golden-brown perfection between slices of buttery rye bread. The satisfying crunch of the toasted bread gives way to an explosion of savory goodness, complemented by the tender beef and sweet onions. It’s a culinary experience that’s both wonderfully complex and incredibly satisfying, offering a sophisticated twist on a familiar favorite. Whether you’re seeking a nostalgic trip back to your favorite diner booth or simply craving a supremely fulfilling meal, crafting your own Grilled Cheese Patty Melts at home is an immensely rewarding endeavor that promises pure comfort with every bite.
Ingredients:
- For the Caramelized Onions:
- 3 large sweet onions (such as Vidalia or Walla Walla), about 3-4 pounds total
- 3 tablespoons unsalted butter
- 1 tablespoon olive oil
- ½ teaspoon salt
- ¼ teaspoon freshly ground black pepper
- 1 teaspoon granulated sugar (optional, enhances caramelization)
- 2 tablespoons water or beef broth (for deglazing, if needed)
- For the Beef Patties:
- 1 ½ pounds ground beef, 80/20 or 85/15 lean (I find this ratio offers the best flavor and moisture)
- 1 teaspoon salt
- ½ teaspoon freshly ground black pepper
- ½ teaspoon garlic powder
- ½ teaspoon onion powder
- 1 tablespoon Worcestershire sauce
- 1 tablespoon olive oil or vegetable oil (for cooking patties)
- For the Grilled Cheese Patty Melts:
- 12 slices rye bread or sourdough bread (I love the tang of rye, but sourdough works beautifully too)
- 6 slices Swiss cheese (I prefer Jarlsberg or Emmentaler for their nutty flavor and excellent melt)
- 6 slices provolone cheese (for extra stretch and a mild, creamy counterpoint)
- 6 slices sharp cheddar cheese (for that classic grilled cheese tang and robust flavor – a mix is key!)
- 6 tablespoons unsalted butter, softened (for buttering the bread)
- Optional: Mayonnaise (I sometimes like to spread a thin layer on the inside of the bread for extra moisture)
- Optional: Mustard (Dijon or whole grain, for dipping or a light spread)
Caramelizing the Onions: The Sweet Foundation
One of the absolute cornerstones of a truly magnificent Grilled Cheese Patty Melt is, without a doubt, the caramelized onions. This step requires patience, but trust me, the reward is an incredibly sweet, deeply savory, and tender component that ties all the other flavors together. Do not rush this process!
-
Prepare the Onions: First things first, peel your onions. Then, using a sharp knife, slice them very thinly. I aim for about ⅛-inch thick slices. You can slice them into rings or half-moons; what’s most important is that they are uniform in thickness to ensure even cooking. Take your time here, as consistent slicing is key to achieving that perfect texture.
-
Heat the Pan: In a large, heavy-bottomed skillet or Dutch oven (I prefer cast iron for its even heat distribution), melt 3 tablespoons of unsalted butter with 1 tablespoon of olive oil over medium-low heat. The olive oil helps prevent the butter from burning at higher temperatures, providing a nice balance.
-
Add the Onions: Add all the sliced onions to the pan. It will look like an overwhelming amount, piled high, but they will cook down significantly. Stir to coat the onions evenly with the butter and oil. Season with ½ teaspoon of salt and ¼ teaspoon of black pepper. If you like, this is also the moment to sprinkle in that 1 teaspoon of granulated sugar. The sugar isn’t strictly necessary, as onions naturally caramelize, but it can accelerate the process and deepen the sweetness slightly.
-
Cook Slowly and Patiently: Reduce the heat to low. This is where the magic happens and where patience truly pays off. Cook the onions, stirring frequently every 5-10 minutes to prevent sticking and ensure even browning. Initially, they will release a lot of moisture and appear translucent. Over the next 45-60 minutes (sometimes even longer, up to 90 minutes, depending on your stove and pan), they will gradually soften, shrink, and transform from pale white to a beautiful golden-brown, then to a rich, deep amber color.
My top tip here: If the onions start to stick to the bottom of the pan and develop a dark crust too quickly, add a tablespoon or two of water or beef broth. Use a wooden spoon to scrape up all those flavorful browned bits from the bottom of the pan – this is called deglazing, and it adds immense depth of flavor to your onions. Keep stirring and scraping as needed.
-
Achieve Perfection: You’re looking for a texture that is incredibly soft and silky, and a color that is a deep, rich brown, almost like dark honey. They should taste wonderfully sweet and savory, with no raw onion bite remaining. Once they reach this stage, remove them from the heat and set them aside. They can be made a day in advance and reheated gently.
Preparing and Cooking the Beef Patties: The Heart of the Melt
The beef patty in a Patty Melt is not just any burger; it’s designed to be a thin, flavorful layer that complements the cheese and onions without overpowering them. Getting the seasoning and cooking right is crucial.
-
Season the Ground Beef: In a medium bowl, combine 1 ½ pounds of ground beef with 1 teaspoon of salt, ½ teaspoon of black pepper, ½ teaspoon of garlic powder, ½ teaspoon of onion powder, and 1 tablespoon of Worcestershire sauce. The Worcestershire sauce adds a fantastic umami depth that really elevates the beef flavor.
-
Mix Gently: Using your hands, gently mix the ingredients until just combined. Avoid overmixing! Overmixing can lead to tough patties. You want the seasonings distributed, but the beef itself should retain its tender texture.
-
Form the Patties: Divide the seasoned ground beef into 6 equal portions. Each portion will make one patty. Now, here’s an important step for a Patty Melt: instead of round burgers, you want to form oblong or rectangular patties. This shape will better fit on your slices of rye or sourdough bread. Aim for patties that are about ½-inch thick and slightly larger than your bread slices, as they will shrink a bit when cooked. I usually make them roughly 4-5 inches long and 2-3 inches wide.
-
Cook the Patties: Heat 1 tablespoon of olive oil or vegetable oil in a large skillet or on a griddle over medium-high heat. Once the oil is shimmering, carefully place the patties in the pan, making sure not to overcrowd it. You might need to cook them in two batches. I like to press them down slightly with a spatula to ensure good contact with the pan, which helps create a nice crust.
-
Flip and Cook Through: Cook the patties for 3-4 minutes per side for medium doneness, or longer if you prefer them more well-done. You’re looking for a beautiful, deep brown sear on both sides. The internal temperature should reach 160°F (71°C) for food safety, but for the purpose of a Patty Melt, a slight pink in the middle is perfectly acceptable if you prefer it. After cooking, transfer the patties to a plate and let them rest for a few minutes. This allows the juices to redistribute, ensuring a more tender and flavorful bite.
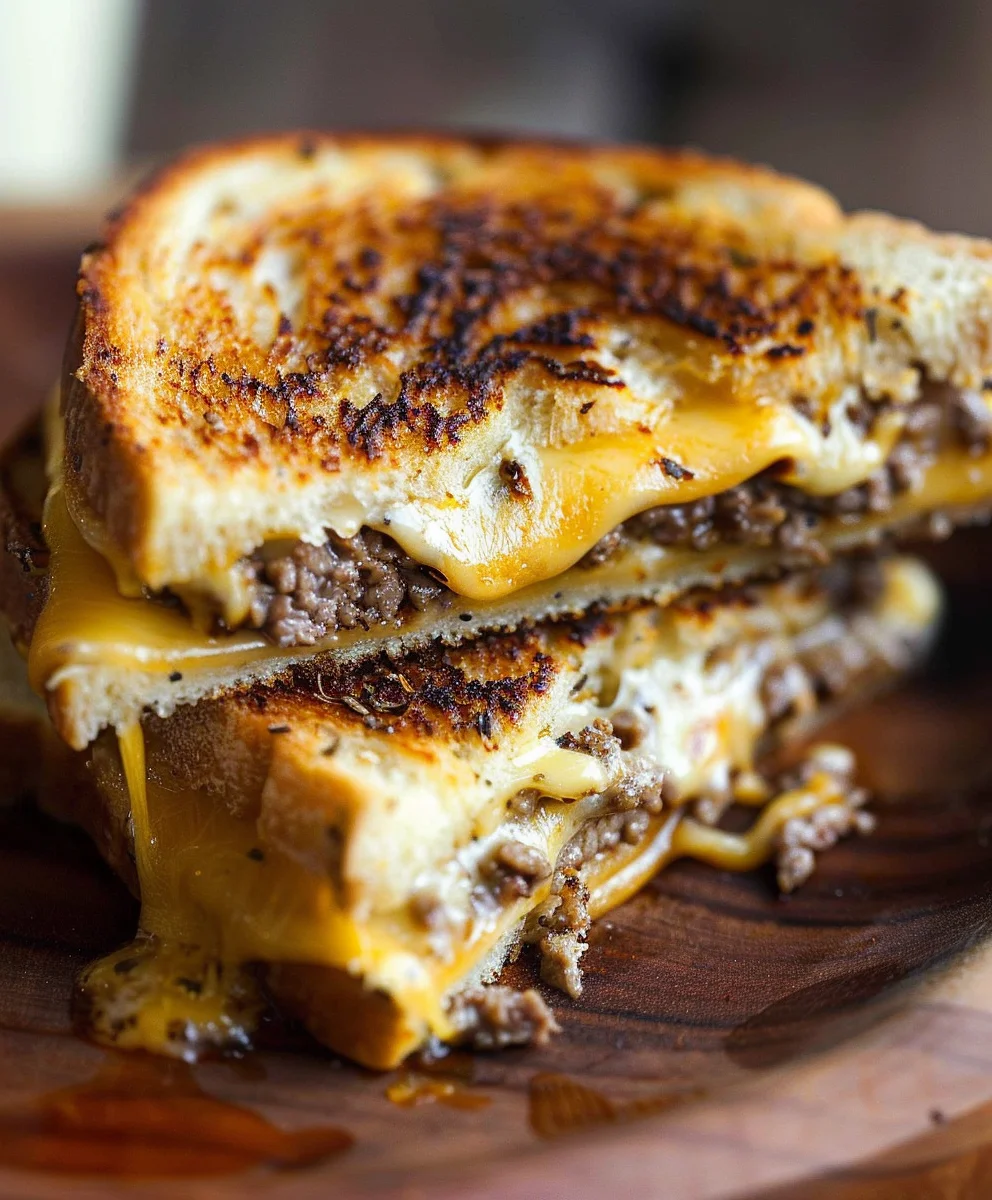
Assembling the Ultimate Grilled Cheese Patty Melts
Now for the fun part: putting all these delicious components together! The layering is crucial for a balanced bite and even melting.
-
Prepare the Bread: Lay out your 12 slices of rye or sourdough bread on a clean surface. For each Patty Melt, you’ll need two slices of bread. On one side of each slice, spread a generous, even layer of softened unsalted butter all the way to the edges. This buttered side will be the exterior of your Grilled Cheese Patty Melt and will be grilled until golden and crispy. If you like, you can also spread a very thin layer of mayonnaise on the non-buttered side of the bread for extra moisture and flavor, though this is purely optional.
-
Layer the Cheese: Take six of the buttered bread slices and place them butter-side-down. On each of these slices, layer your cheeses. I like to start with a slice of Swiss, then a slice of provolone, followed by a slice of sharp cheddar. This creates a really robust cheese blend with different melting points and flavor profiles. The goal is to ensure maximum cheese pull and flavor.
-
Add the Patty and Onions: On top of the cheese layers, carefully place one of your cooked beef patties. Make sure it’s centered and fits nicely within the cheese. Then, spoon a generous amount of your delicious caramelized onions over the beef patty. Don’t be shy here – the onions are a star! Spread them evenly over the patty.
-
More Cheese!: To ensure the Patty Melt holds together beautifully and to add even more cheesy goodness, place another layer of cheese on top of the caramelized onions. I usually use another half slice of Swiss and a half slice of cheddar, or whatever I have left, just to seal everything in. This acts like a delicious, melted glue.
-
Top with Bread: Finally, take the remaining six buttered bread slices and place them butter-side-up on top of the assembled ingredients. Gently press down on each sandwich to make sure all the layers are snugly together. Now you have six perfectly stacked Patty Melts, ready for grilling!
Grilling to Golden Perfection
This is the final stage, and it’s where your Grilled Cheese Patty Melts truly come to life. The goal is a golden-brown, crispy exterior and a gooey, melted interior. Medium-low heat is your best friend here!
-
Preheat Your Griddle/Skillet: Heat a large griddle or two large non-stick skillets over medium-low heat. It’s important not to go too high with the heat here. If the pan is too hot, the bread will burn before the cheese has a chance to fully melt and everything inside is warmed through. You want a steady, gentle heat.
-
Place the Melts: Carefully place the assembled Grilled Cheese Patty Melts onto the preheated griddle or skillet. Again, do not overcrowd the pan. Work in batches if necessary to ensure even cooking.
-
Grill the First Side: Cook for about 4-6 minutes per side. As the first side cooks, the butter on the exterior of the bread will begin to sizzle, and the bread will start to turn golden brown. I often like to place a heavy lid or another pan on top of the sandwiches during this step. This gentle pressing helps to flatten the sandwich slightly, ensuring maximum contact with the pan for a crispier crust, and also traps heat, helping the cheese to melt more efficiently.
-
Check and Flip: After 4-6 minutes, carefully lift one corner of a sandwich to check the color. You’re looking for a beautiful, deep golden-brown crust. Once achieved, use a wide spatula to carefully flip each Patty Melt to the other side.
-
Grill the Second Side: Continue to cook for another 4-6 minutes, or until the second side is also golden brown and crispy. By this point, the cheese inside should be wonderfully gooey and melted, cascading around the patty and onions. The internal ingredients should be piping hot.
Listen to your sandwich! You should hear a gentle sizzle, not an aggressive crackle. If it’s cooking too fast, lower the heat. If it’s taking too long and not browning, slightly increase the heat.
-
Remove and Rest: Once both sides are perfectly golden and the cheese is fully melted, carefully remove the Grilled Cheese Patty Melts from the griddle or skillet and transfer them to a cutting board. Let them rest for 1-2 minutes. This brief rest is crucial. It allows the cheese to set slightly, preventing it from oozing out excessively when you cut, and also gives all the hot components a moment to stabilize.
Serving Suggestions and Pro Tips
Congratulations! You’ve just crafted a magnificent batch of Grilled Cheese Patty Melts. Now, let’s ensure you serve them up in style and get the most out of every bite.
-
The Perfect Cut: For the ultimate presentation and ease of eating, I always recommend cutting your Patty Melts diagonally. This creates two attractive triangles and makes them much easier to handle. A sharp, serrated knife works best for a clean cut through the crispy bread and gooey interior.
-
Classic Pairings: These Grilled Cheese Patty Melts are incredibly rich and satisfying on their own, but they are absolutely divine when paired with certain classic sides. A warm bowl of creamy tomato soup is a quintessential partner, perfect for dipping. Crispy dill pickle spears offer a delightful tang that cuts through the richness, while a simple green salad with a light vinaigrette provides a refreshing contrast. A side of crispy french fries or sweet potato fries is also a fantastic, indulgent choice.
-
Sauce It Up (Optional): While the Patty Melt itself is bursting with flavor, a little extra something on the side can be fun. A small dish of extra Dijon or whole grain mustard, or even a simple “fry sauce” (ketchup and mayo mixed) can be a great addition for dipping.
-
Make-Ahead Components: If you’re planning to make these for a crowd or want to save some time, both the caramelized onions and the beef patties can be prepared in advance. The caramelized onions can be made up to 3 days ahead and stored in an airtight container in the refrigerator, then gently reheated. The cooked beef patties can also be made a day in advance and reheated in a microwave or gently in a pan just before assembly. This makes the final grilling process incredibly quick and easy.
-
Reheating Leftovers: If by some miracle you have any leftover Grilled Cheese Patty Melts, the best way to reheat them is in a dry skillet over medium-low heat. This allows the bread to crisp up again without becoming soggy, and the cheese to re-melt beautifully. Avoid the microwave if possible, as it tends to make the bread soft and chewy.
-
Experiment with Cheese: While my preferred cheese blend provides a fantastic balance, feel free to experiment! Monterey Jack, Gouda, or even a sharp Provolone can add different dimensions. The key is to use cheeses that melt well.
-
Bread Choices Matter: Rye and sourdough are my go-to’s for their robust flavor and ability to stand up to the fillings. However, a good quality artisanal white bread or pumpernickel can also be delicious if you prefer. Just make sure it’s sturdy enough to hold all that goodness!
Enjoy every single glorious bite of your homemade, perfectly crafted Grilled Cheese Patty Melts. They’re a true comfort food masterpiece!
Conclusion:
So, there you have it, my friends! We’ve journeyed together through the simple yet profound steps to create a sandwich that transcends mere ingredients and becomes something truly special. This isn’t just another item on your culinary to-do list; it’s an invitation to experience comfort food elevated to an art form, a symphony of textures and flavors that will undoubtedly become a staple in your home. From the moment the butter hits the pan and the bread begins to toast to that first glorious bite where the crispy exterior gives way to a juicy, perfectly seasoned patty and a cascade of molten cheese, you’ll understand precisely why I’m so enthusiastic about this particular creation. It’s an embrace in sandwich form, a dish that effortlessly brings smiles and satisfies even the deepest cravings for something hearty and utterly delicious.
The beauty of these Grilled Cheese Patty Melts lies not just in their incredible taste, but also in their deceptive simplicity and impressive versatility. They are a testament to the idea that sometimes, the most profound culinary joys come from thoughtfully combining familiar components. The caramelized onions add a touch of sweetness that balances the savory richness of the beef, while the perfectly toasted bread provides that essential crunch, a crucial counterpoint to the gooey, stretchy cheese. Every element plays a vital role in creating a harmonious whole, making each bite an absolute pleasure. It’s the kind of dish that makes you close your eyes and savor the moment, a true triumph of flavor and texture that I am confident you will adore as much as I do.
Serving Suggestions & Creative Variations to Elevate Your Experience:
Now that you’re well-equipped to master this magnificent meal, let’s talk about how you can make it truly your own, or perhaps, present it in a way that delights and surprises. For a classic diner experience, I highly recommend serving your patty melt alongside a generous portion of crispy, golden French fries, perhaps seasoned with a sprinkle of smoked paprika, and a tangy dill pickle spear to cut through the richness. If you’re leaning towards a lighter, yet equally satisfying accompaniment, a vibrant green salad with a zesty vinaigrette would provide a refreshing contrast. And, for the ultimate comfort food pairing, there’s simply nothing better than dipping your patty melt into a warm bowl of creamy tomato soup – a match made in culinary heaven that truly completes the experience.
But don’t stop there! The true fun of cooking often comes from experimentation. Feel free to explore different cheeses beyond the traditional American or Swiss; a sharp cheddar, smoky provolone, or even a spicy pepper jack can introduce exciting new dimensions. Consider varying your bread choice too; while rye is classic, a hearty sourdough or a buttery brioche can offer delightful alternatives. Want to kick up the flavor profile even more? Try adding crispy bacon, sautéed mushrooms, or a smear of your favorite homemade aioli or sriracha mayo before toasting. For those who prefer a meat-free option, a thick slice of grilled portobello mushroom or a robust plant-based patty makes an excellent substitute, proving that the patty melt is wonderfully adaptable to various dietary preferences without sacrificing an ounce of flavor or satisfaction.
Your Turn: Share Your Culinary Adventures!
I truly hope this recipe inspires you to step into your kitchen, preheat that skillet, and embark on your own journey to creating these incredible patty melts. There’s a profound joy in preparing something delicious with your own hands, and I promise, the reward of that first perfect bite will be immeasurable. Don’t just take my word for it; experience the magic for yourself! Once you’ve tasted the sheer delight of these patty melts, I’d absolutely love to hear about your experience. Did you stick to the classic? Did you venture into creative variations? What was your favorite part of the process, or perhaps, the most unexpected success?
Please, I encourage you to share your culinary triumphs! Snap a photo of your magnificent creation and share it with the world. Your success stories, your innovative twists, and even your “oops” moments are all part of the beautiful journey of cooking. Let’s inspire each other to explore, to create, and to savor every delicious moment. Happy cooking, my friends, and may your kitchen be filled with the wonderful aroma of your very own, perfectly crafted Grilled Cheese Patty Melts!

Irresistible Grilled Cheese Patty Melts
A beloved diner classic, combining juicy beef patties, sweet caramelized onions, and gooey melted cheese between buttery rye bread, grilled to golden perfection. This recipe offers a sophisticated twist on a familiar favorite, promising pure comfort with every bite.
Ingredients
-
3 large sweet onions
-
3 tablespoons unsalted butter
-
1 tablespoon olive oil
-
½ teaspoon salt
-
¼ teaspoon freshly ground black pepper
-
1 teaspoon granulated sugar (optional)
-
2 tablespoons water or beef broth (for deglazing)
-
1 ½ pounds ground beef, 80/20 or 85/15 lean
-
1 teaspoon salt
-
½ teaspoon freshly ground black pepper
-
½ teaspoon garlic powder
-
½ teaspoon onion powder
-
1 tablespoon Worcestershire sauce
-
1 tablespoon olive oil or vegetable oil (for cooking patties)
-
12 slices rye bread or sourdough bread
-
6 slices Swiss cheese
-
6 slices provolone cheese
-
6 slices sharp cheddar cheese
-
6 tablespoons unsalted butter, softened (for bread)
-
Optional: Mayonnaise (for inside bread)
-
Optional: Mustard (Dijon or whole grain, for dipping)
Instructions
-
Step 1
Peel and thinly slice 3 large sweet onions. In a large, heavy-bottomed skillet, melt 3 tbsp unsalted butter with 1 tbsp olive oil over medium-low heat. Add sliced onions, ½ tsp salt, ¼ tsp black pepper, and optional 1 tsp sugar. Stir to coat. Cook on low heat, stirring frequently, for 45-90 minutes until deeply golden brown, soft, and sweet. If sticking, deglaze with 2 tbsp water or beef broth. Remove from heat and set aside. -
Step 2
In a medium bowl, gently combine 1 ½ lbs ground beef, 1 tsp salt, ½ tsp black pepper, ½ tsp garlic powder, ½ tsp onion powder, and 1 tbsp Worcestershire sauce. Avoid overmixing. Divide into 6 equal portions and form into ½-inch thick oblong or rectangular patties, slightly larger than your bread slices. -
Step 3
Heat 1 tbsp olive oil or vegetable oil in a large skillet over medium-high heat. Cook patties for 3-4 minutes per side for medium doneness, pressing lightly with a spatula for a nice crust. Transfer to a plate and let rest. -
Step 4
Lay out 12 slices of bread. Butter one side of each slice generously. (Optional: Spread a thin layer of mayonnaise on the non-buttered side.) On 6 buttered-side-down slices, layer Swiss, provolone, and sharp cheddar cheese. Place a cooked beef patty on top, then spoon generous caramelized onions over the patty. Add another layer of cheese (e.g., ½ Swiss, ½ cheddar) on top of the onions. Top with the remaining 6 buttered-side-up bread slices. Gently press all layers together. -
Step 5
Preheat a large griddle or two non-stick skillets over medium-low heat. Place assembled Patty Melts onto the hot surface. Cook for 4-6 minutes per side, until the bread is golden brown and crispy and the cheese is wonderfully gooey and melted. Placing a heavy lid or another pan on top helps flatten and melt cheese more efficiently. Remove from heat and let rest for 1-2 minutes on a cutting board. -
Step 6
Cut the Patty Melts diagonally with a sharp, serrated knife. Serve immediately with classic pairings like tomato soup, dill pickle spears, or fries. Optional: Offer Dijon mustard or a simple fry sauce for dipping.
Important Information
Nutrition Facts (Per Serving)
It is important to consider this information as approximate and not to use it as definitive health advice.
Allergy Information
Please check ingredients for potential allergens and consult a health professional if in doubt.


